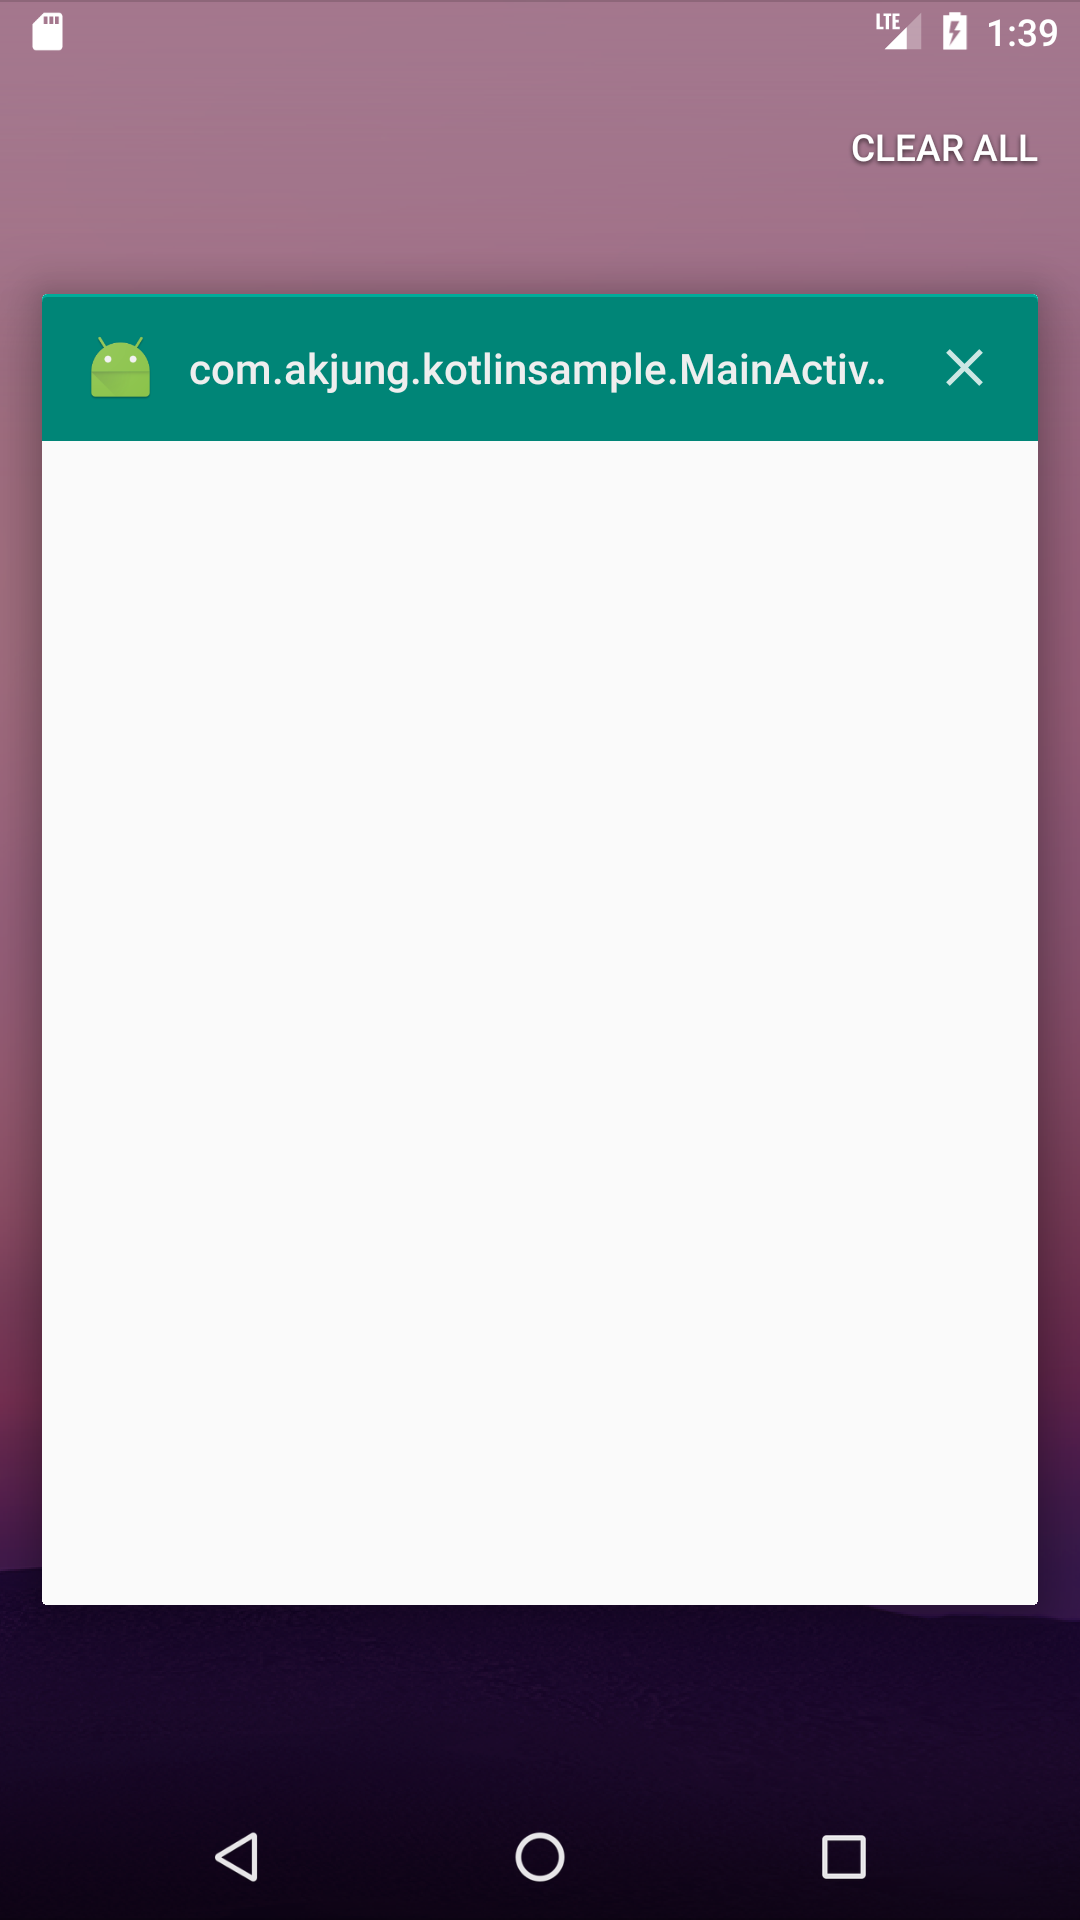
Android 폰에서 하드웨어 최근앱 (메뉴??) 키를 누른경우 프로세스에 있는 앱들이 보여진다.
이때 아래 그림처럼 화면을 백지처럼 만들고 싶을때 Activity Create 함수에 넣어준다.
화면 캡쳐 방지 코드이기도 하다.
getWindow().addFlags(WindowManager.LayoutParams.FLAG_SECURE)


Android 폰에서 하드웨어 최근앱 (메뉴??) 키를 누른경우 프로세스에 있는 앱들이 보여진다.
이때 아래 그림처럼 화면을 백지처럼 만들고 싶을때 Activity Create 함수에 넣어준다.
화면 캡쳐 방지 코드이기도 하다.
getWindow().addFlags(WindowManager.LayoutParams.FLAG_SECURE)
안드로이드에는 Sensor 종류
int TYPE_ACCELEROMETER A constant describing an accelerometer sensor type. -> 가속도계 센서 타입
int TYPE_ALL A constant describing all sensor types.
int TYPE_AMBIENT_TEMPERATURE A constant describing an ambient temperature sensor type -> 주위 온도 센서 타입 (쓰이는지는 잘모르겠다)
int TYPE_GRAVITY A constant describing a gravity sensor type. -> 중력 센서
int TYPE_GYROSCOPE A constant describing a gyroscope sensor type ->자이로스코프 센서(회전운동, 센서?)
int TYPE_LIGHT A constant describing an light sensor type. -> 광센서
int TYPE_LINEAR_ACCELERATION A constant describing a linear acceleration sensor type. ->선가속도센서
int TYPE_MAGNETIC_FIELD A constant describing a magnetic field sensor type. -> 자기장 센서
int TYPE_ORIENTATION This constant is deprecated. use SensorManager.getOrientation() instead. -> 방향 센서
int TYPE_PRESSURE A constant describing a pressure sensor type -> 압력 센서
int TYPE_PROXIMITY A constant describing an proximity sensor type. -> 근접센서
int TYPE_RELATIVE_HUMIDITY A constant describing a relative humidity sensor type. -> 상대습도 센서
int TYPE_ROTATION_VECTOR A constant describing a rotation vector sensor type. -> 회전센서
int TYPE_TEMPERATURE This constant is deprecated. use Sensor.TYPE_AMBIENT_TEMPERATURE instead. -> 온도 측정 센서
List<Sensor> m_sensorlist = sm.getSensorList(Sensor.TYPE_ALL);
if(!m_sensorlist.isEmpty()){
Sensor snsr;
for(int i=0;i<m_sensorlist.size();i++){
snsr=m_sensorlist.get(i);
String snstyp;
switch(snsr.getType()){
case Sensor.TYPE_ACCELEROMETER : snstyp="TYPE_ACCELEROMETER";break;
case Sensor.TYPE_ALL : snstyp="TYPE_ALL";break;
case Sensor.TYPE_GYROSCOPE : snstyp="TYPE_GYROSCOPE";break;
case Sensor.TYPE_LIGHT : snstyp="TYPE_LIGHT";break;
case Sensor.TYPE_MAGNETIC_FIELD : snstyp="TYPE_MAGNETIC_FIELD";break;
case Sensor.TYPE_ORIENTATION : snstyp="TYPE_ORIENTATION";break;
case Sensor.TYPE_PRESSURE : snstyp="TYPE_PRESSURE";break;
case Sensor.TYPE_PROXIMITY : snstyp="TYPE_PROXIMITY";break;
case Sensor.TYPE_TEMPERATURE : snstyp="TYPE_TEMPERATURE";break;
default: snstyp="UNKNOWN_TYPE "+snsr.getType();break;
}
Log.d(TAG, "Sensor."+snstyp);
}
}
로 조회 결과
가지고 있는 테스트 폰의 갤럭시 S는 아래처럼 나온다. TYPE_GYROSCOPE는 지원을 안해서 값을 알수가 없다.
Sensor.TYPE_ACCELEROMETER
Sensor.TYPE_MAGNETIC_FIELD
Sensor.TYPE_ORIENTATION
Sensor.TYPE_LIGHT
Sensor.TYPE_PROXIMITY
Sensor.UNKNOWN_TYPE 9
Sensor.UNKNOWN_TYPE 10
Sensor.UNKNOWN_TYPE 11
URL url = new URL(_url);
URLConnection uc = url.openConnection();
uc.setConnectTimeout(CommonConstants.SOCKET_TIME_OUT);
uc.setReadTimeout(CommonConstants.SOCKET_TIME_OUT);
DocumentBuilderFactory factory = DocumentBuilderFactory.newInstance();
DocumentBuilder builder = factory.newDocumentBuilder();
Document doc = builder.parse(uc.getInputStream());
화면 바닥에 깔리는 툴바가 애니메이션후에 애니메이션 끝난 위치로 고정되게 하고 싶어
이리저리 검색과 테스트 결과
http://www.androidpub.com/361442 에서 고맙게도 글을 올려주신 분이 있어서
해결...
<set xmlns:android="http://schemas.android.com/apk/res/android" android:interpolator="@android:anim/accelerate_interpolator"
android:fillAfter="true">
<translate android:fromYDelta="100" android:toYDelta="50"
android:duration="500" />
</set>
저 옵션만 주면 끝난다. 무한감사 ^^
출처 : 안드로이드펍 : http://www.androidpub.com/361442

Call this to try to give focus to a specific view or to one of its descendants.
A view will not actually take focus if it is not focusable (isFocusable()
returns false), or if it is focusable and it is not focusable in touch mode
(isFocusableInTouchMode()) while the device is in touch mode.
See also focusSearch(int), which is what you call to say that you
have focus, and you want your parent to look for the next one. This is
equivalent to calling requestFocus(int, Rect) with arguments
FOCUS_DOWN and null.
-------------------------------------------------------------------------------
public final boolean requestFocusFromTouch ()
Call this to try to give focus to a specific view or to one of its descendants.
This is a special variant of requestFocus() that will allow views that are
not focuable in touch mode to request focus when they are touched.
----------------------------------------------------------------------------------------------------------------
EditText 에서는 위의 requestFocus로 실행시키면 포커스가 오고 button 같은 경우는 requestFocusFromTouch 로 하니 된다.
출처 : http://developer.android.com/reference/android/view/View.html#requestFocus()

WVGA icon size : 72x72 HVGA icon size : 48x48 QVGA icon size : 36x36
Pixel : 480 x 800 Pixel : 320 x 480 Pixel : 240 x 320
3.7in 3.2in 2.7in
densityDpi : 240 densityDpi : 160 densityDpi : 120
px을 dp로 변환한다면 dp = px * 0.66625로 계산한다.(해상도480*800 기준)
DisplayMetrics displayMetrics = new DisplayMetrics();
((Activity) context).getWindowManager().getDefaultDisplay().getMetrics(displayMetrics);
WidthPixel = displayMetrics.widthPixels;
HeightPixel = displayMetrics.heightPixels;
pixel = dp * displayMetrics .density;
[출처] 안드로이드의 dp와 px 그들은 무었인가?|작성자 dythmall
This is a protected intent that can only be sent by the system.
키가드가 해제 되었을때 시스템에서 날려주는 action 다른 퍼미션은 필요없다.

|


 SensorTestSample.zip